skip to main |
skip to sidebar
Fast on the heels of hosting my first dinner party in my new apartment, I invited a couple of my girlfriends over for a "True Blood: Season 2" marathon (thank you hbo ondemand!).
 Knowing we would need plenty of energy to see us through the day, top of mind was making sure we'd have enough food and drink to see us through hours of watching Eric and Jason, and wondering who in tarnation thought it was necessary for either one of them to bother with wearing a shirt. (i mean, really. a shirt? on either of them? *sigh* so unnecessary.)
Since it was a Sunday, my friends and I collaborated on a brunch menu. They brought fruit and veggie platters (my mom would be so proud) and the fixins for fruity rum drinks and bloody marys (mom might question this one).
I volunteered to do the baking. (so selfless of me, don't you think?) Keeping with the brunch theme, I made an easy quiche using a recipe from my family's B&B days. This recipe also appeared at my Easter dinner. This cheater's quiche does not count for the blog though. So, for the sake of my poor little blog, I decided to use a recipe for scones from "Baking in America: Traditional and Contemporary Favorites from the Past 200 Years." And, for the pure fun of it, I made a recipe for Bacon Cheddar Scones that I saw featured on Tastespotting.com, a site I love and adore. The featured Tastespotting photo was of scones made by Pink Parsley, and I used the recipe she posted on her site as well.
For whatever reason, I decided to make the Bacon Cheddar Scones first. Maybe it had something to do with the fact that I wanted to nibble on two or three slices of bacon sooner rather than later. (photo note: the bacon cheddar scones above are featured on my #PlateSwap plate. loves it!)
In any case, the Bacon Cheddar Scones were relatively easy to make. Me and my trusty pastry cutter got along just fine, and I had the distinct joy of mixing the bacon, cheese and green onion bits into the dough by hand. The result was a pleasing ball of dough that did just what it was supposed to do when I rolled it out and cut it into triangles.
With those scones in the oven, I turned my attention to making the "Baking in America" scones. The exact recipe calls for currants. I hate currants. Raisins too. So, I made a substitution and set out to make White Chocolate Cranberry Scones.
 These went so far awry that it's not even funny. At least I can say it was not my fault. Having made the Bacon Cheddar Scones, having read a few other scones recipes and having enjoyed more than my fair share of scones made by others, I knew what the finished product was supposed to look like.
So far as I can deduce, the dough for the second batch of scones was just plain ol' wrong. It was wet, sticky and did not have enough flour by any stretch of the imagination. The "Baking in America" recipe called for one cup of cake flour and one cup of all-purpose flour. Most other recipes I had seen, including the Bacon Cheddar Scone recipe, called for about three cups of flour.
"Baking in America" is a cookbook I loved reading. It's one of the first cookbooks I purchased despite it's shocking lack of pictures (i like pictures in my cookbooks). I wanted to have faith in it and in the belief that maybe I just didn't know what I was doing and that, somehow, someway, the recipe would magically turn out all right.
Well, it didn't.
Aside from substituting cranberries for currants and adding some white chocolate chunks, I followed the blasted recipe and the baking directions.
What a mistake. I should have gone with my gut and added about a cup of flour to the dough. Then, instead of a mass of chewy, not-scones, I would have had proper scones. The scones were edible and my friends liked the flavor of them, but the texture of them killed me. Under other circumstances, I would have chucked those suckers into the garbage. However, my friends are the sort I trust not only with my successes, but also with my failures.
While I will not pass the failed recipe on to you until, at some point, I figure out the right flour proportions, I will share with you the Bacon Cheddar Scones recipe, which came out just the right kind of savory and delicious .
Bacon Cheddar Scones - Makes eight scones
Adapted from Pink Parsley's Blog
3 cups all-purpose flour
1 Tablespoon baking powder
1 teaspoon salt
2 teaspoons freshly ground black pepper
½ cup chilled, unsalted butter, cut into small cubes
1 ½ cups finely grated cheddar cheese
4 green onions, thinly sliced
10 slices of bacon
¾ to 1 ½ cups buttermilk
Preheat the oven to 400 degrees.
I bake my bacon. As family, friends and readers of this blog know, frying is a dangerous activity so far as I'm concerned. (see here and here and here and here) If you're like me, then here's how you bake the bacon. Put some metal wire racks in a rimmed cookie sheet. Spray them with PAM cooking spray. Place the bacon slices side by side on the wire racks. They can touch just barely, but don’t let them overlap. Bake them for about 20 minutes or until they’re as crispy as you like them.
Or, you know, you can fry your bacon like normal people do. Either way, after they’re done, drain the extra grease off the bacon. When the bacon is cool enough, crumbled or chop the slices.
If you were baking your bacon, leave the oven heated at 400 degrees. If you weren't baking the bacon, now would be a good time to turn it on.
Sift the flour, baking powder, salt and pepper into a large bowel. Using a pastry cutter (or forks or a couple of butter knives) cut in the cubes of butter until the mixture is crumbly. The bits of butter and flour will about the size of flattened peas, but not all of the flour will be incorporated at this point.
Add the grated cheese and mix with your fingers just until blended. Don’t over mix the dough though because the heat of your fingers will melt the butter too much.
Add the bacon, green onions and ¾ cup of buttermilk. Mix by hand until all the ingredients are incorporated.
If the dough does not hold together and is too dry, add more buttermilk 1 tablespoon at a time, mixing lightly with each addition.
Do this until the dough is pliable and can be formed into a ball. Remember, don't overwork the dough or the scones will tough.
Place the dough on a lightly floured surface. Using your hands still, pat the dough ball into an 8-inch circle about a ½ inch thick. With a large, sharp knife, cut the dough into 8 wedges. You can make smaller scones, but be sure to keep an eye on them while baking so that they don't burn.
Line a cookie sheet with parchment paper. Place the scones on it with a little space between each one.
Bake 18-20 minutes or until golden brown.
These taste great warm. They taste great the next day. They also taste great on day three when you have to grab breakfast and run to the airport before you miss your flight (just saying, you know, in case you were wondering...).
A word on storing these. I baked these the night before the True Blood marathon with my friends. Once they had cooled, I stacked them on a plate, covered them tightly with foil and left them on the kitchen counter at room temperature.
After the brunch, I put them in Ziplock baggies and stored them in fridge, knowing that I might not eat the leftovers quickly enough before they started molding. Pop them in the microwave for a few seconds or in a toaster over for a minute or three to warm them up before eating them.
Now that fall has arrived and is doing a very good impression of winter, I crave the kinds of foods that make you feel warm and cozy, and that fill the house with the scent of cooking.
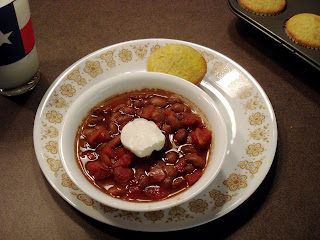 Inspired by a chat with my parents, I really wanted a big pot of beans. And I was so proud of my organizational skills because I had all of the ingredients. I had the bag of dried pinto beans, a smoked ham hock, fixins for cornbread and assorted toppings. However, after I’d sorted through the beans to pick out any possible stray stones and then set them on the stove for a quick soak, I learned that my preparations were foiled by the blasted ham hock, which had decided to grow a fine layer of icky fuzz. Lesson learned: smoked ham hocks actually can go bad.
No fears though. I had a Plan B because the grocery store just down the block from my place has a decent meat department.Yeah. No dice. The darned store didn’t have a ham hock nor any other suitable replacement ingredients because it was Sunday and they were out of just about everything. Fabulous.
I huffed and puffed and kicked some pebbles around on the short walk home. After that mini-temper tantrum, I decided that this was not going to be the end of the world. I would be resourceful and follow my waste-not rule by using whatever I might have in the cupboards. The pot of beans might not be what my parents would typically make, but it would still be a darned good pot of beans.
Luckily, I remembered I had a container of McCormick’s smokehouse-flavored pepper. This is normal ground pepper, but with a bit of a flavor kick. Since the smoked ham hock had thwarted me, I figured this might make a decent substitute. I was right. Here's the approximate recipe.
Plan C Pinto Beans - Makes about 8 servings1 lb of dried pinto beans1 can of Hunt’s Fire Roasted Tomatoes1 can of Ro*TelSaltSmokehouse Ground Black Pepper from McCormick
Pick through the dried pinto beans to make sure there aren’t any fugitive rocks or icky beans. Rinse the beans (not the fugitive rocks and icky beans) in a colander. After rinsing, put the beans in a large pot filled with water about an inch over the beans and about a teaspoon of salt. Bring the beans to a fast boil and then let them soak, covered, for about an hour.
 After the beans have soaked, make sure there’s enough water in the pot to keep the beans more than covered. Season the beans with one to two teaspoons of the smokehouse pepper and ½ a teaspoon to one teaspoon of salt.
Bring the beans to a boil again and let them simmer until the beans get nice and tender. This takes about two hours. Give or take.
Be sure to stir the beans occasionally. If too much water boils off, add more. You want to make sure that the beans can simmer easily and aren’t sticking to the bottom of the pot or burning.
About 30 minutes before you’re ready to serve the beans, stir in the cans of Ro*Tel and Fire Roasted Tomatoes.
At this point, taste test the beans. You may want to add some pepper or salt.
Serve the beans in bowls with cornbread. Top it with your favorite fixins. I like shredded cheese, sour cream and chow-chow.
Enjoy!
Disclosure: Hunt's Tomatoes and Ro*Tel are made by the company for which I work, ConAgra Foods.
My obsession with cookbooks was one of the driving forces behind the start of this blog. In addition to cookbooks, I'm also obsessed with magazines. In particular, food and home magazines. House Beautiful is one the magazines I love the most. It has inspired me on more than one occasion.
 However, while House Beautiful routinely features recipes and the like, the October 2009 issue was the first one that drove me into the kitchen. The weather also helped since fall had settled in and brought some cruddy, overcast, stay-indoors-all-weekend weather with it.
There was just one little problem. I didn't have the exact ingredients for the recipe. So, I did what made the most sense to me, I used the recipe as guiding post to make my own soup with the ingredients I had on hand.
The result was a hearty bean and vegetable soup that was even better the next day when I took in to work for lunch.
Bean & Veggie Soup - Makes about 4 servings
Adapted from a recipe featured in House Beautiful, October 2009
2 15oz-cans kidney beans, drained & rinsed
3 to 4 cups chicken stock
2 cloves garlic, thinly sliced
2 tablespoons olive oil
1 medium onion, roughly chopped
2 stalks of celery, roughly chopped
1 14.5oz-can diced tomatoes
1 teaspoon sea salt or kosher salt
1/4 cup fresh, chopped parsley or 1/2 teaspoon dried cilantro
grated Parmesan cheese
In a large pot, combine kidney beans, chicken stock and garlic. Bring to a boil, lower heat and simmer for about 20 or 30 minutes.
While the beans are simmering, in a separate skillet, saute the chopped onion and celery in the olive oil until soft and nearly translucent. This takes about 5 minutes.
Stir diced, canned tomatoes into the onions and celery. I used Hunt's Fire Roasted Diced Tomatoes (made by my company) for the extra kick of flavor. Season with the kosher or sea salt. Simmer for about another 4 minutes.
Add vegetable mixture to the beans. Season with fresh parsley or dried cilantro, depending on what you have at home.
Simmer for about 15 minutes so that the flavors combine.
Serve in bowls with Parmesan cheese sprinkled on the soup for garnish and flavor, and serve with a slice or two of bread to sop up the soup juices.
Enjoy!
This weekend, after blogging a bit about my family’s B&B days and after sharing a blueberry recipe with a friend, I felt the need to put that recipe to work for myself.  The below recipe is for Noni’s Blueberry Coffee Cake. Noni was our next door neighbor when we lived in Maine, and she shared this recipe with us. We, in turn, served the results to our B&B guests, who loved it. As you can imagine, blueberry-containing dishes were a regular feature on our menu given that we were in Maine. And not just any ol’ part of Maine, but Washington County, Maine, where 90 percent of the nation’s blueberries are grown. That’s right. Ninety percent. Don’t believe me, visit this page then. Unfortunately for me, while I love Noni’s Blueberry Coffee Cake as is, I don’t live in Maine anymore. Getting fresh blueberries in Nebraska is a little bit on the tricky side of things. And, don’t kid yourselves, those icky, faux blueberries from New Jersey don’t pass muster any whatsoever. No. Those come off of tall bushes and are artificially ginormous in comparison to genuine Maine blueberries, which have to be raked by hand from blueberry bushes that grow close to the ground. In any case, having no fresh blueberries, I decided to follow my waste-not rule and used the frozen raspberries that have been sitting in my freezer for a couple of months now. And you know what? It turned out a-ok. In fact, I liked it a lot. And so did my co-workers who were my guinea pigs today. So, there you go. Substitutes do work. And now, the recipe...Noni's Blueberry Coffee Cake1/2 cup butter, room temperature1 1/2 cups sugar2 eggs, room temperature1/2 cup buttermilk, room temperature1/2 teaspoon baking soda2 cups all purpose flour2 cups fresh or frozen blueberries (if frozen, do not thaw) or a 12oz bag of frozen raspberries (do not thaw)1/2 cup all purpose flour (to coat the berries)1/4 cup sugar for toppingPreheat oven to 350F. Sift together 2 cups flour & baking soda. Set aside.Cream together butter & sugar. Add eggs one at a time, mixing thoroughly. Alternate adding flour mixture & buttermilk until thoroughly combined.In a separate bowl, toss blueberries in 1/2 cup of flour. Fold gently into the batter.Spread batter into a well-greased 9x13 pan. (Note: This is a thick batter & you will have to spread it with a spatula to get it in the pan evenly. Don't work if you mash to berries a bit, the final result will be just fine.)
Lightly sprinkle with the extra 1/4 cup of sugar for a topping. Bake 45 minutes. Serve hot or at room temperature for best taste.Most importantly … Enjoy!
 Knowing we would need plenty of energy to see us through the day, top of mind was making sure we'd have enough food and drink to see us through hours of watching Eric and Jason, and wondering who in tarnation thought it was necessary for either one of them to bother with wearing a shirt. (i mean, really. a shirt? on either of them? *sigh* so unnecessary.)
 These went so far awry that it's not even funny. At least I can say it was not my fault. Having made the Bacon Cheddar Scones, having read a few other scones recipes and having enjoyed more than my fair share of scones made by others, I knew what the finished product was supposed to look like.


 Posts
Posts


